Wednesday, November 14, 2018

Lipstick and Sawdust - Tutorials

Back to Basics

Here is a tutorial on how to get plywood cut at a lumber store. 


         Recently I came across a very informative article click link  HERE on how to have a better experience in the wood cutting department at a local "big box store" or "lumber store". This can be an intimidating place especially for women, as this is not a task we are usually taught when we are younger. This article was so helpful I decided to use the tips in real time and video myself while putting them into practice. Turns out the tips worked! I was in and out with cut plywood and ready to drive home in 21 minutes! Check out my video. Most suggestions are from the article, or just tricks I have picked up since getting wood cut for almost 8 years.

Thank you! Kristen
Drop me a line, follow me on IG for lots and lots of updates: @kristensawdust

Saturday, September 15, 2018

Beachfront Bargain Hunt Part 3 Kitchen Remodel

Beachfront Bargain Hunt Part 3 Kitchen Remodel


Hi readers! Thanks for following my beach house renovation series. Today we tackle the kitchen remodel. You will see pics from the kitchen demolition, to the kitchen renderings, to the choices we made for the biggest and smallest items in the kitchen. Truth be told our contractors were pretty terrible. We ran into many snags with this remodel, as expected, but these were very difficult to come back from. The end result is stunning, but it took us a while to get there. I started the design with the contractor in November of 2017. And... it finally was finished in September of 2018. This should not have taken this long, especially since we did not change the footprint too much. Our original timeframe was February- May.

Kitchen demo.

The contractors were so terrible in fact that we sent my in laws to live in the beach house during the renovations to monitor (read:babysit) the remodelers. Goodness, I think they were there for a total of 2 months.... just to get the big items completed. Thank you In Laws!!!!

I found the video I made explaining our plans.
Take a look: 


So here are some rendering photos for the design:


You can check out my beach house inspiration board on Pinterest. 


Here are our final choices for the kitchen-----We used Lowes cabinetry and purchased most appliances from Lowes as well.

Cabinetry: Averley collection White Shaker Cabinets


Countertop: Silestone (Quartz) in Royal Reef

Backsplash:


In store combo. 

Wall Paint Choice: Benjamin Moore Half Moon Crest


 Faucet choice: Kraus KPF- 168CH Pull Down Single Faucet in Chrome


Appliances: All Whirlpool except downdraft range is KitchenAid


My "thing" about designing kitchens usually has to do with "stations". For example, here is where you get your coffee, here is where you prep food, here is where you do the cooking, here is where you fix your drink or grab a beverage, here is where you sit, here is where you clean. 

I really wanted to add an exciting part to the kitchen to the "here is where you fix your drink or grab a beverage" so I chose a beverage refrigerator to be installed on the other side of the peninsula, a place that was a wasted corner where the stools would go. 


Also, here are some highlights from the design--

Base cabinets:
  • I wanted pot drawers - at least 4 - they are great for cookware, and allow for 
  • flex space in the peninsula.
  • A trash and recycling drawer was a must. 
  • A deep narrow base cabinet was a must for cookie sheets and cutting boards.
  • Instead of a "lazy susan", the corner space will be used for the beverage refrigerator. 
  • Install additional cabinet on end of peninsula for small appliances. 
  • Have one sliding drawer for "junk drawer" as we will need space for keys and boat keys, and pens, etc.
Upper cabinets:
  • Cabinets are to be installed to the ceiling and added crown at the top makes the 8 foot ceilings look higher. 
  • The bulkhead must be dealt with and not modified. I had to work around it so installing a blank spacer made the cleanest look for the top cabinets
  • Cabinets above refrigerator must be tight to top of refrigerator for built in feel (this is overlooked and has to be mitigated later). 
  • Build coffee station with uppers and lowers with added electrical outlet for coffee maker. 
  • Beadboard on ends of all base cabinets and flat side panels for upper cabinets (because the headboard NEVER gets actually ordered and it was delaying the progress). 
  • One glass cabinet for beverage station. 
  • Add wine X cabinet for wine and liquor bottles at beverage station.  
Handles, knobs and pulls- I always use a mix of these for visual interest. Most doors will have a knob, most drawers will have a pull (to different sizes for different drawer sizes). Special mermaid knobs to be installed on coffee station main top cabinets for variety and whimsy.

Knob selections- 

Where's your top??
Link for mermaid knobs, amazon, 11 dollars each. You need a left and right. 
Click here.


5 inch pull 

3 inch pull

I even had a plan for where each knob should go. They will be drilling holes in the cabinetry, which are expensive. You need to be this detailed. 


Gut! Gut! Gut! GUT! GUT!

Nice Gut!!!


After the gut of the kitchen, the cabinets were FINALLY delivered after many cancellations of the delivery and many times driving down to accept delivery. 

We had to make an executive decision. At this point, we sent my in-laws down to monitor the job. 

Boxes...
...and boxes.


My in-laws painted all areas of the kitchen where cabinets would not be hung, and. the insides of the pantry and closets. 

Then the construction started, yay!

Peninsula re-installation. Saving flooring. 
Rebuilding peninsula.

Lots of pot drawers!

Coming along. Pot Drawers.  
Seeing a problem already with the refrigerator.
No gaps remember? 
Paint color working well.
Can we just rip out that light already??

Coffee Station coming along.

Contertops (quartz arrives), these are some heavy and large slabs. I am not a fan of granite. Quartz is so much easier, you don't have to pick out a slab because the patterns are very consistent.

Sir, may I offer you a Cheez-it? 

Pretty!

So shiny!


Yaaasss!!!!

Love this combo. 

The appliances arrive, and my father-in-law installs all lighting.... And shades. He is an electrical engineer, and a Navy Vietnam veteran! A great guy to have around. In a later post I will go over all of the electrical rewiring this house needed to make code. Turns out it becomes a lot of work for him. 

My deep D shaped sink with new garbage disposal.

Inside of the fridge. Gap at top- over 7 inches.
Have to order a spacer that will fit with an overlay. 

Love these bamboo shades!

Plug too deep. Another issue to be dealt with.

Downdraft Range. Damaged in back- #discount.

Beverage Refrigerator. I love when it lights up blue at night.

Then, after the trim is added, the backsplash is added, and it is gorgeous!


Coffee station ready to go - and does not block the light from the windows.

My little topless mermaids. What shall we name them?

And that's it for the most part of the kitchen. I will be adding information about the lighting changes and window treatments in another post. Hope you like some of these after images. This was quite a renovation. 

Like me on Facebook
Follow me on instagram

- Kristen 


Wednesday, September 12, 2018

Beachfront Bargain Hunt Renovation Part 2

Continuing on with our Beachfront Renovation... 

So lets see some more photos of our bargain hunt, shall we? 

While touring the home here are some listing pics and some very crappy sketches of what my mind was picturing while walking through. I looked at the space and immediately came up with changes that would make it spectacular. HGTV shows do this with fancy software that makes you go.."ooohhhhh"!!!! Truth is, that's not what we have here, (Ain't nobody got time for dat!) and I was limited on my picture markup to about 5 colors. 

Let's see what we saw and then what I had pictured. Starting with the outside curb appeal. Please note the outside is still a work in progress. While the inside is complete, we are still planning the outside design. Such simple changes can be made. 

Outside front elevation:

Pretty dated and depressing looking. 
Add curb appeal
Ok, so for the outside my list of "upgrades":

1. Paint brick very light grey, or whitewash.
2. Paint siding white. 
3. Paint front porch to match grey shutters.
4. Make shutters out of leftover scrap dark grey trex deck. 
5. Remove huge hedges, replace with some simple rounded shrubs. 
6. Paint front door a bold color. 
7. Stencil or freehand in paint house number in lower case cursive. 
8. Add cool handle for the door. 
9. Seal driveway again. 
10. Add security lights. 
11. Add new light and mailbox.
12. Add vertical house numbers so it can be seen by emergency responders.  
13. Buy new car? (but wait...I still have to 10 months to trade in my car...) 

First Floor--front half of house. 

Kitchen and entrance. How about the floors?
They look pretty good. Should we keep them?
Lots of ideas. 
First floor changes list:

1. Add statement light at entrance foyer. 
2. Paint all walls.
3. Take down horrible track lighting. Replace with something more modern. 
4. Take down all wall items and clutter. 
5. Keep floors. (Really, this is the only thing that will end up staying.)
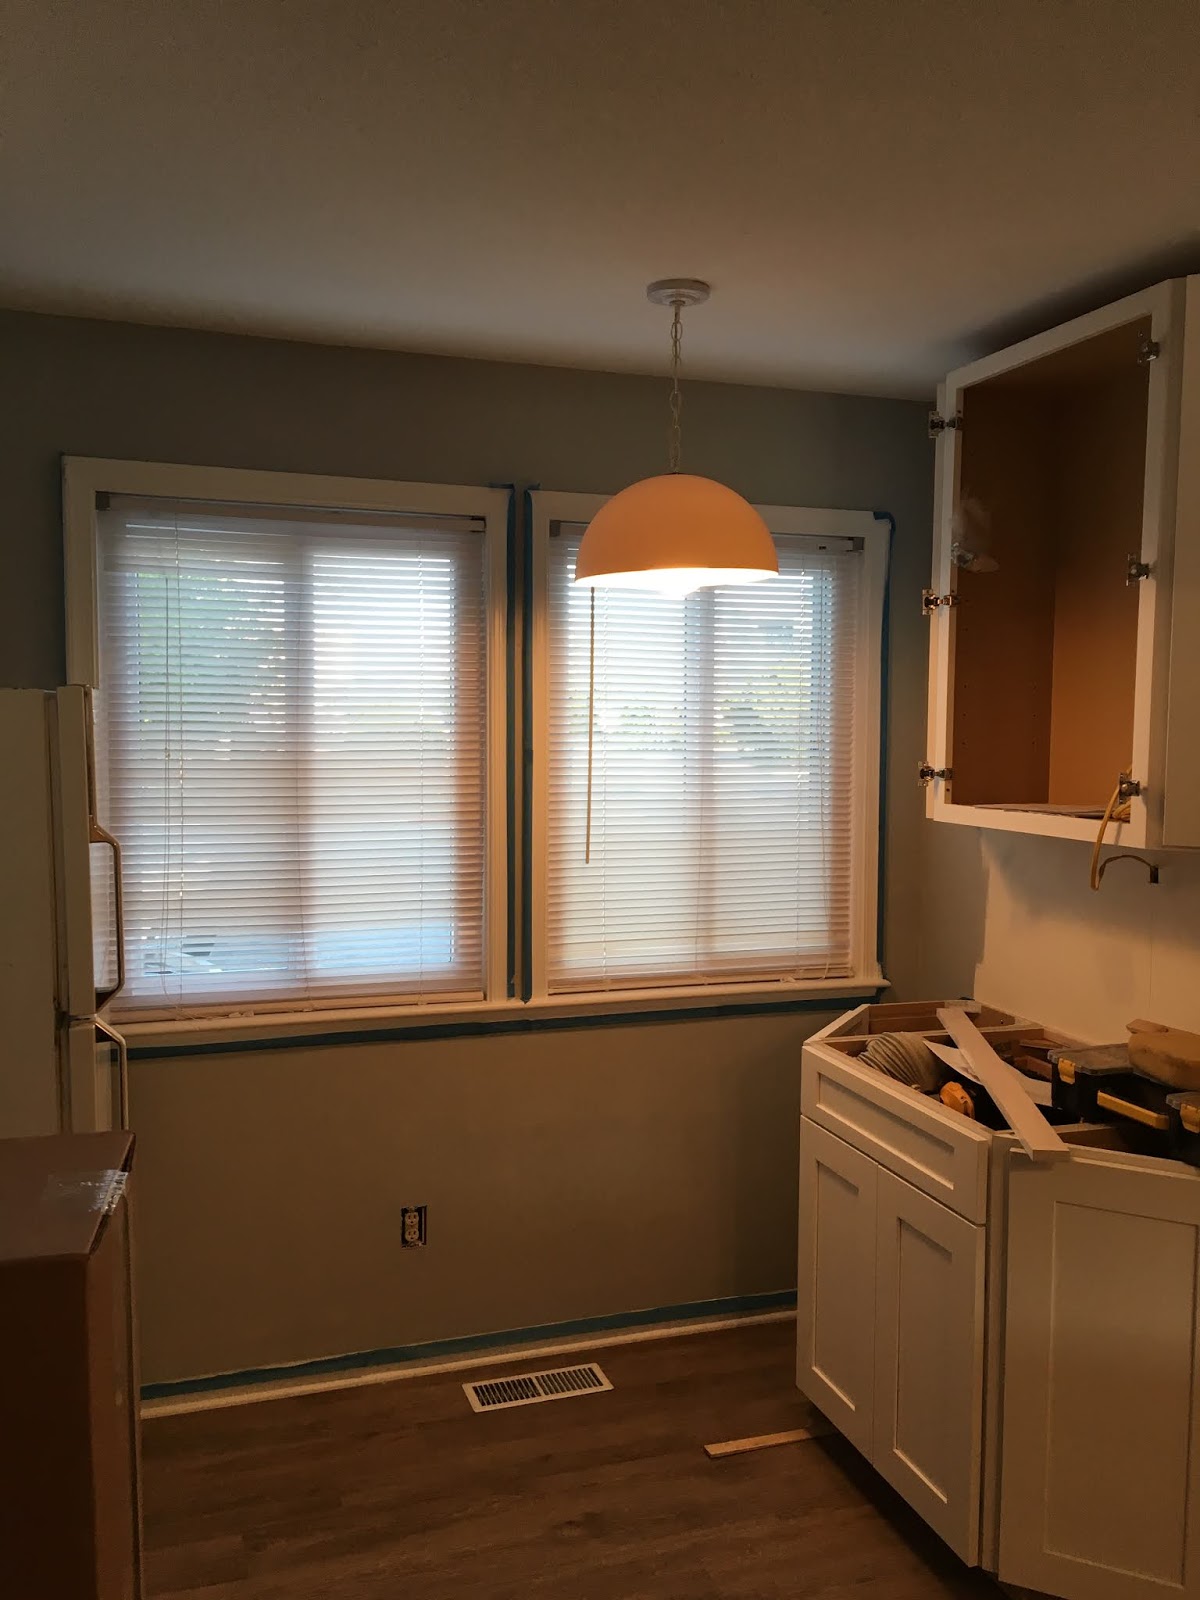
6. Gut kitchen. Renovate. Trash all appliances. 
7. Add new stools at counter height, swivel for kids. 
8. Add new coastal art. 
9. Add new appliances.
10. Choose beachy modern backsplash. 
11. Install silestone (quartz), no granite.
12. Integrate beverage refrigerator or separate ice maker.  

Next View partial kitchen First Floor: 

Everything needs to go. 

What a nice sketch. 
So for this angle:

1. Remove dated white light fixture. 
2. Remove all crap from walls. 
3. Remove all window treatments and blinds. Add bamboo roman shades. 
4. Gut rest of the kitchen. 
5. Paint walls and trim. 
6. Create a coffee station and add more storage. 
7. Remove table and seating - too cramped. 
8. Add focal point with tile and whimsical knobs at coffee station. 
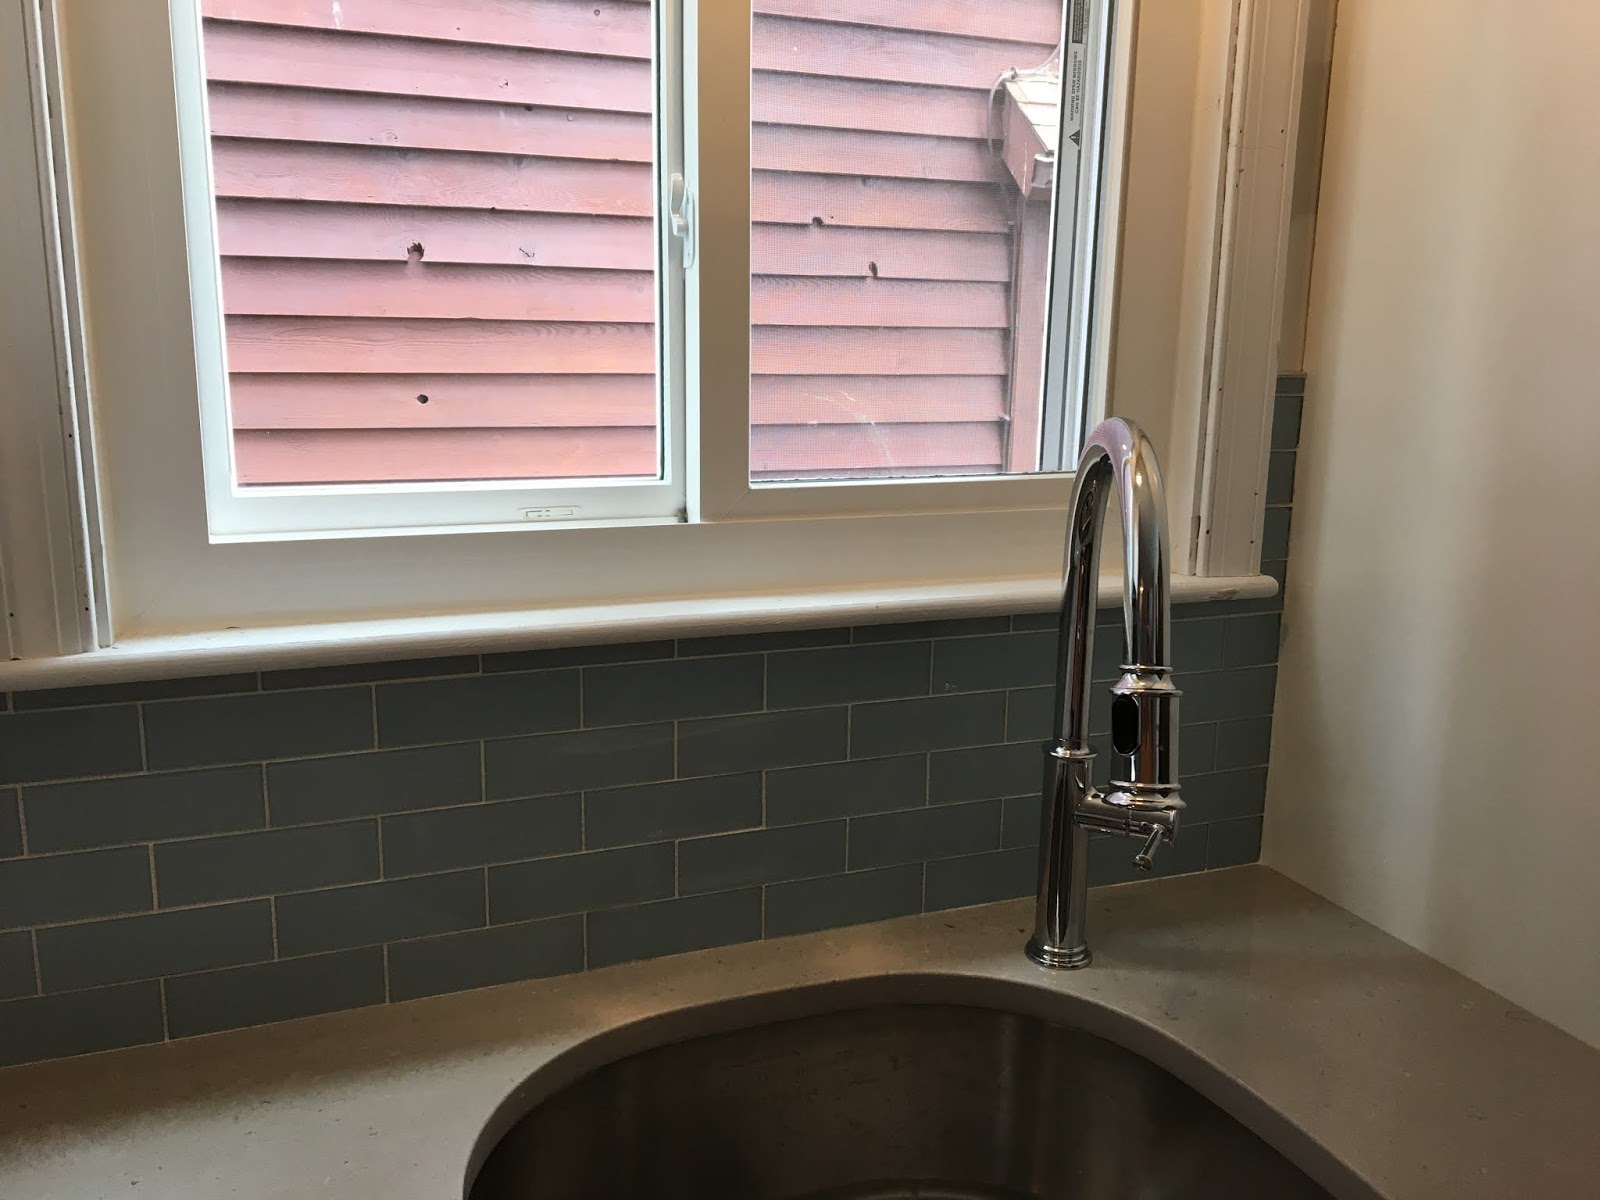
9. Add chrome fixtures and deep sink. 
10. Build island and completely reconfigure kitchen layout. (This gets permanently vetoed by hubby. Booo!)
11. Install faux roman shades (fabric: blue striped) at sink window. 


Here's the view of the living room
Sunken living room, cool! 

This needs mostly cosmetics.

Here's what we are going to do with the living room:

1. Paint all walls and trim.
2. Paint railing room separator white. 
3. Add extra large blue sleeper sectional.
4. Remove ceiling fan and add nautical sleek ceiling fan.
5. Make my own special custom artwork. 
6. Build balustrade coffee table. Add storage for blankets underneath. 
7. Add large striped rug.
8. Add two side tables and lamps. 
9. Have custom pillows embroidered by my mom. 
10. Keep flooring. 


Turning around to other side of room. 

Ok, I can work with this.

Staging fail. No. No. No. 

Gonna be lookin good.

For fireplace angle: 

1. Paint room and trim. 
2. Paint brick white. 
3. Remove brass fireplace cover. Repaint black with high heat spray paint. 
4. Get rid of clutter on walls.
5. Get TV cabinet and raise TV. 
6. Remove corner oak shelf. Do this immediately! (Sooo 80's)
7. Remove mantle and refinish with coastal driftwood finish. Reinstall.
8. Get rid of all blinds. Add bamboo-like panels to sliding door. 
9. Add rug. 
10. Stage mantle with more modern coastal decor. 
11. Add large Maryland blue crab picture for center. 
12. Get new washer and dryer. 
13. Install cabinetry in laundry and storage closet.

And for this smallish space between the kitchen and living room:

Almost unusable. Let's make it practical.  
Sorry, horrible, horrible drawing, but we will make it exquisite.
Trust me, my family and I will not be sitting in these two chairs having "tea and strumpets".

What shall we do with this wasted space?

1. Paint all walls and trim. 
2. Add large jute and denim rug. 
3. Build custom coastal table that can seat 6 people. 
4. Add artwork. 
5. Create beautiful centerpiece, with height. 
6. Replace brass light fixture (want a chandelier but ceiling is only 8 foot) with modern nautical/coastal fixture. 
7. Paint baluster white. 
8. Purchase blue parsons chairs.

Now, Let's head upstairs!

Stairs-- no pic needed.

1. Remove all carpet
2. Fix creaky steps. 
3. Replace with affordable grayish neutral carpet. 
4. Add whimsical artwork on open walls. 
5. Paint all handrails and railings. Paint all walls and trim. 
6. Replace all light fixtures with modern nautical fixtures. 


And the...Master Bedroom- where the magic sleeping happens. Tommy Bahama coastal chic style.
Ugh... the GOT chair in the corner! So. Many. Silk. Flowers. 
Big ideas here. This is a fairly easy fix.

The master bedroom needs the following changes:

1. Paint all walls and trim and ceiling.
2. Purchase chunkier heavy wood louvered king bed with matching high drawer piece. 
3. Make room theme "Raw Coast" by Tommy Bahama. With blues, greys and taupe linen. 
4. Artwork to be nautical sketches or patent art.  
5. Remove curtains and blinds. 
6. Add 2 layered draperies on double hung rod. Sheer on bottom and silk taupe on top. Must be room darkening. 
7. Install new palm style lighted long rod ceiling fan. 
8. Create a work space for hubby to work remotely. Need desk, storage and power cables. 
9. Add two nightstands (small) with two coastal lamps. 
10. New neutral carpet.


Moving on to the two other bedrooms: 

My son's room will be just completely awesome! 

So small and dated. No character at all.

This place will be fit for a surfer. And sleep 3 comfortably. 
How to transform my son's surfer room room:

1. Paint walls and trim. 
2. Install nice big wall darkening dark blue grommet panel curtains.
3. Keep room darkening cellular shades. (This was the only thing worth saving.)
4. Follow a grey, dark blue and green "surfer" color palate. 
5. Set up grey twin bunk beds with trundle, add 3 mattresses. 
6. Add dresser drawer storage in grey. 
7. Add in surfer whimsy art, make room inviting for kids.
8.  Have cart for toys and legos and books.
9. Remove ceiling fan. Find fan that will not decapitate guest on top bunk. A lighted caged fan will work. 
10. Add reading lights to all bunks. 
11. New neutral carpet.
12. Blue quilts and pillows with whimsical surfer pillows.


And last but not least my daughter's room also being used as guest bedroom when needed. 


Dated...and musty. 

This will be beautiful!
My daughters room theme will be a mermaid room, but not a character-y little kids room, more of a grown up mermaid's room.

1. Paint room and trim medium to dark teal.
2. Replace ceiling fan with white sleeker lighted ceiling fan. 
3. Install large white headboard and queen mattress. 
4. Add two nightstands and lamps. All white furnishings.
5. Install chest of drawers and large television for guests. 
6. Add whimsical art and collage of mermaid collectables. 
7. Keep room darkening shades. 
8. Add two types of curtains, both sheers with fancy trims, and thicker saturated room darkening coral panels. 
9. Color palate to be dark teal, coral, and white. 
10. Add pillows for texture and coziness. 

....So there you have it. 

Pretty much all main spaces have a plan. Now we need to execute that plan. And will 90% of my vision actually happen?  Yes it will. And.... for those of you who can't wait to see a before and after photo.

I'll place two down below. Inquiring minds want to know. 

Kitchen look. 

Fireplace makeover. 

Stay tuned for more details and our renovation journey. 
Drop me a line, or just say hi.- Kristen