
Custom Chalkboard Wall

Well- Its nap time which = blog time for me! Yea!
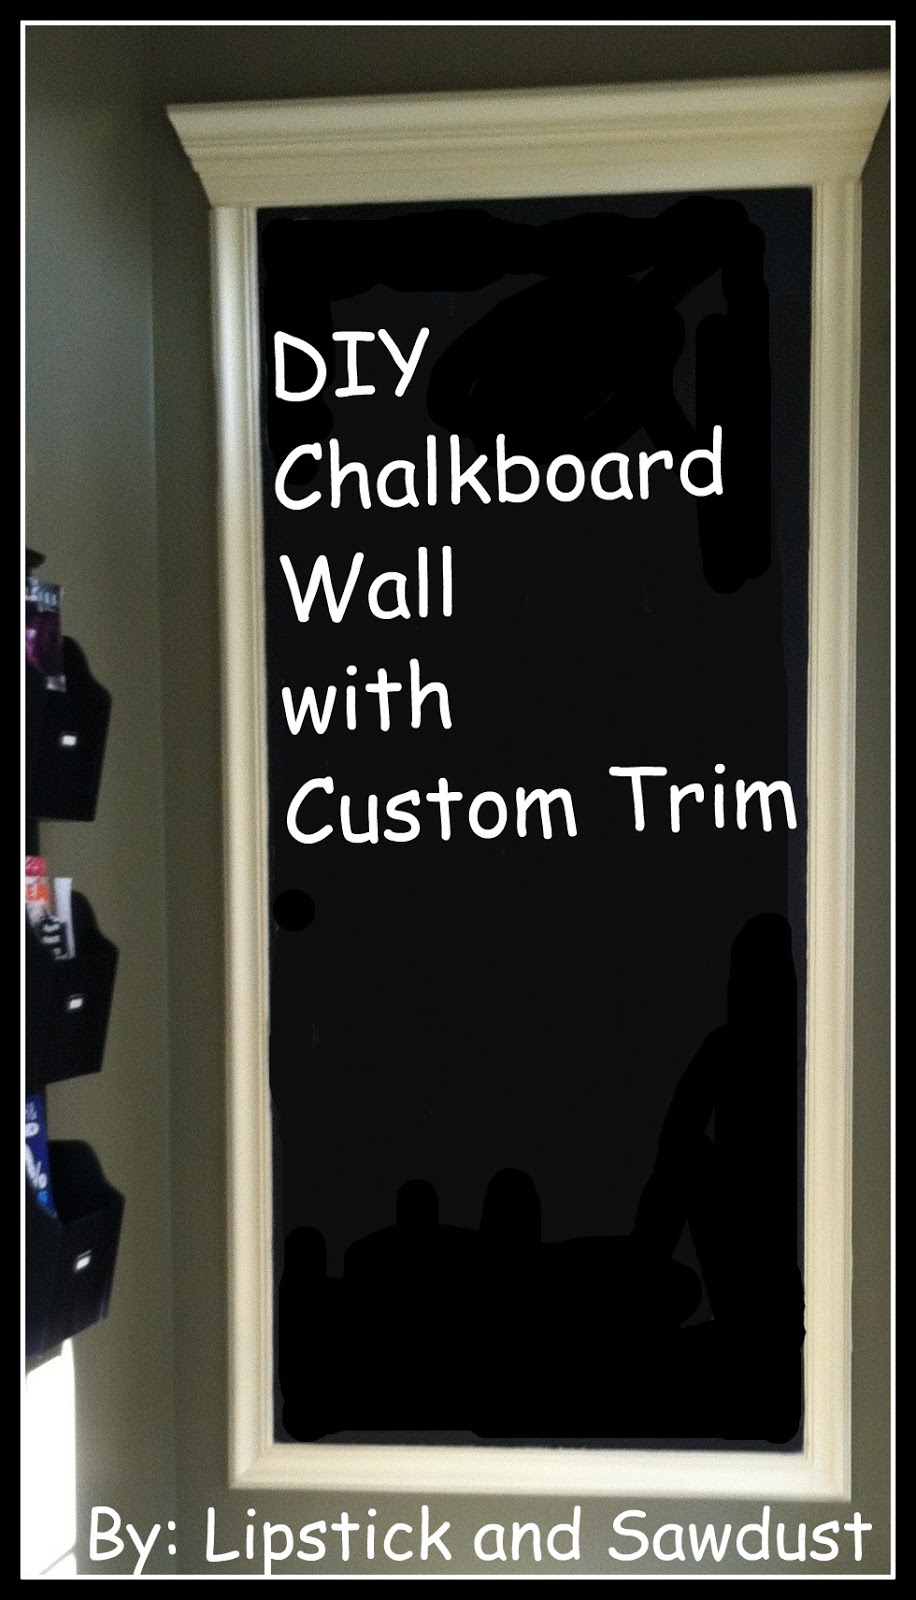
Time to post another tutorial. As part of my Mudroom remodel- I took an empty wall and turned it into a practical space for a custom wall chalkboard. I can write the weeks activities, or important dates - it was so easy to make it cost me next to nothing, because I had all of the supplies already. The trim-work was all scraps. I was inspired by this mirror- it is beautiful and has a hefty price but I looked at it and thought- I can build that (but as a chalkboard).
My inspiration:
 |
| Restoration Hardware - Trumeau Mirror |
Here's how I made it:
The wall before:
 |
| Wall before - though not a straight on picture of it. |
I started by painting most of the wall- the color of the rest of the room- Kingsport Grey- by Benjamin Moore. Leaving unpainted the space (about) where my chalkboard would go, it did not have to be perfect, I knew I would have to touch up the paint later.
 |
| Painting wall. |
Then I used crown scraps I had bought months back for 25 cents a foot at the Habitat for Humanity Restore. My plan was for a rectangular frame trim with a bulky crown top made of simply stacking various trims together to make the top thicker.
I started with the bottom and worked my way up- the first piece is chair railing cut at 45 degrees on the ends, I attached that one to the wall first with wood glue and a brad nailer.
 |
| First bottom piece. |
 |
| Bottom right corner. |
Then I added the left side- again bottom 45 degree angle and the top straight across.
 |
| Bottom and sides attached directly to wall. |
Now for the top. I wanted the top trim to look chunky or bulky. So I took several scrap trim pieces along with a piece of crown moulding and stacked them all on top of each other. Unfortunately, I had a picture of cutting the moldings but lost it somewhere. I stacked all pieces of trim together and cut on both sides a 30 degree angle on the end sides.
 |
| Top trim at 30 degree angles at top. |
 |
| Rust-Oleum Black Chalkboard paint |
 |
| Chalkboard paint is applied directly to the wall. |
Then I used caulk and caulked all around the trim. Here is the finished product:
 |
| Chalkboard with Moldings. |
I added letter bins that I purchased at Homegoods long ago. I organize coupons, magazines, bills, receipts etc. Now with my Reclaimed wood bench this is the perfect practical space for organization and storage.

Happy Building and Enjoy!
Don't forget to "Like" us on Facebook!
Kristen
It turned out great! I love it :_
ReplyDelete
ReplyDeleteWow…outstanding service and products to meet our office needs. I Love all and the colors you choose are perfect. I want this furniture for my new house. Thanks a lot for sharing
furniture manufacturers in chennai
I was diagnosed as HEPATITIS B carrier in 2013 with fibrosis of the
ReplyDeleteliver already present. I started on antiviral medications which
reduced the viral load initially. After a couple of years the virus
became resistant. I started on HEPATITIS B Herbal treatment from
ULTIMATE LIFE CLINIC (www.ultimatelifeclinic.com) in March, 2020. Their
treatment totally reversed the virus. I did another blood test after
the 6 months long treatment and tested negative to the virus. Amazing
treatment! This treatment is a breakthrough for all HBV carriers.
lipstick boxes usa
ReplyDeletewholesale lipstick boxes
This chalkboard wall looks like a great way to stay organized and add some personality to the space.
ReplyDelete