
Pottery Barn Inspired Console Table

I made this console table a few months ago and am finally getting around to posting how I made it.
Pottery Barn's Consoles:
 |
| Sawyer Console Table 799.00 |
 |
| Keaton Console Table $799.00 |
Initially, I wanted to build a long skinny table for the my hallway upstairs that connects my daughters room and the guest room. I built this table custom to fit in that space. Once I was finished with the table, I loved it so much, it did not even make it upstairs. I created a display right in my living room. I guess the upstairs hallway console will have to be another project for another day.
The plan for the table was to have four legs, a pretty top, and 4 "false drawer" panels on the face of the table. I did not use a particular pattern for this table, I just used the knowledge of how I made the Farmhouse Side Table and extended it some and changed the sides. Ok, I guess it is almost nothing like the side table, but you can see the construction inspiration, right? Also, I used some inspiration from Ana-White.com and her fantastic building website for the Balin Console Table plan.
Actual final Console measurements:
57" length x 17" wide x 33 1/2 inches tall.
Here's how I built the Console:
First, I took a series of 2x2 scraps 11.5 inches long, stacked them and glued them together with gorilla glue. Then I added two 2x2's at 32 inches long to the ends of the stacks, I gorilla glued them then added 2 inch countersunk screws at each end, four on each side.
I built two of these. These are the ends of the console table.
FYI-You could also use a wider piece of wood as the end plates, for example a 1x8 or 2 1x4's etc. Use any scraps you may have, you just need enough for the width of two ends.
 |
| Build two end pieces for the table. |
Then, I had to join the two legs together. I laid the end pieces on their sides and added one length of 2x2 at 50 inches to join the pieces, this has now become the front of the table bottom support. I used gorilla glue and screwed the 2x2 ends to the legs.

Then, I added two short stubby 2x2's on top of the bottom joint. This will help give the false drawer fronts some stability and look more "built in".
"Stubby" 2x2's are seen here on the left and right sides of the table. I attached them through the underside of the 2x2 long joint.
 |
| Front of table is on the floor. |
Then I stood the table up to make sure it was all level.

Now was time to work on the"false drawers". See my tutorial on how to create false cuts.
I used two small boards I bought at ikea in the clearance room 10 pieces for one dollar (!). I knew I would have to sand the finish off of them but they would be perfect as the false drawer fronts. So much easier than having to build drawers...very tedious.
FYI: Once the false drawers are stained, the inside grooves of the false cuts collect more stain making them appear deeper, creating the appearance of a real drawer.
Then, I added one more stubby 2x2 in between both false drawer panels.
 |
| Attaching false panels to front of console using glue and finishing nails. |
Then I added the back supports:
 |
The above picture actually shows the front after the back was assembled. For the back, I added one 2x2 at 50 inches to the bottom of the back panel, as well as a scrap board 3 1/2 inches wide cut to 50 inches (the length) of the back.
For the bottom of the console, I added 4 2x2's to the legs for extra support, then across for the support and shelf I was going to add later.
 |
| Bottom supports. |
For the bottom shelf:

Bottom shelf assembly:
This was all made of scrap wood.
FYI-
One thing I have learned about building shelves for the bottom of tables:
1) You can mix and match the wood because it will all be stained the same color and...
2) The shelf will be filled with lots of nicknacks so it doesn't matter what the seams etc. look like.
I cut two heavy plywood scraps and attached them to the 2x2 supports. Then I used scrap 1x2's that had been cut at odd lengths and puzzle pieced them together and filled in the cracks with wood filler in order to create a "border" around the shelf.
Next comes the top:
For the top I used yet another one of my floor planks (inherited from my sister-in-law after her wood floors were installed years ago) for the top. I love the way this wood looks, and its character... when stained especially!
I attached the top to the base with countersunk screws, gorilla glue and finishing nails.
After attaching the top I filled in all holes with wood filler, and sanded, sanded, sanded with my orbital sander. Then vacuumed the table to get rid of sawdust, and wiped clean with a wet towel.
I used the stain I had leftover from my Farmhouse table . See that post for stain mixture formula. I apply my stains using a rag, and go with the grain. I swipe over the stain with a cleaner part of the rag in order to smooth out any dark/thick areas where the stain has collected.

 |
| Closeup of character of wood- I love it! |
After the entire table was stained, I added 3 coats of poly-acrylic in clear satin, allowing to dry after each coat.
Then, I added the hardware to the false drawers. I found 4 of these cabinet pulls in my basement in an "extras" box kept after my house was built - they were extra kitchen cabinet pulls. Score!
 |
| Cabinet pulls. |
Now, I moved the console inside of the house, but it did not make it past the living room. I placed it under a mirror in the living room, this area needed something, don't you think??
 |
| And...its toddler friendly! |
 |
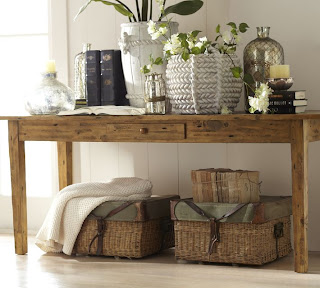
| Top of console. |
 |
| Console with vignette. |
Hope you enjoyed this post of the Pottery Barn Inspired Console Table. Drop me a line with any comments/ compliments.
Thanks!
Kristen
Love this table...it is an improvement over what Pottery Barn offered.
ReplyDeleteThis table is absolutely gorgeous! I cannot believe you built this and that it looks 1000x better then Pottery Barn's look-alike. I love Pottery Barn but I think I love you more now =]
ReplyDeleteYour table is gorgeous and if I didn't know where either came from, I would choose yours any day. You did a fantastic job! Do you think I could talk you into making one for me? : )
ReplyDeleteYour table is by far my favorite!! Awesome instructions for the build too!! Congratulations!
ReplyDeleteGreat job! First time reader of your blog...I am checking out other posts now!
ReplyDeleteWOW! nice work!
ReplyDeletewow, again, this is excellent. I just read through all the instructions you gave. Wish I had this when I was starting to build tables a few years ago....would have made a huge difference. I like the way you do these false drawers. Well done!
ReplyDeleteI LOVED this post! You did such a fine job!
ReplyDeleteBeautiful job, well done. Hoping I can get hubby to help me make one or more. New to your blog but planning on keeping tabs!!!
ReplyDeleteAbsolutely love it! You're a rock star!
ReplyDeleteto buy console table this link can be really helpful. The link is -
ReplyDeleteconsole table
Really Awesome………very nice post. You are Expert in your profession. It's a very interesting in a post. I appreciate you keep do a posting.Sliding wardrobe
ReplyDeleteFurniture is what turns your house into a home.We are running our Furnitures over 25 years and we are one of the leading wooden furniture manufacturers
ReplyDeleteHi there,
ReplyDeleteThank you so much for the post you do and also I like your post, Are you looking for Buy Saw Dust in the whole USA? We are providing Buy Wood pellet Buy Wood briquette, WOOD PALLETS FOR SALE, Buy Saw Dust, Firewood For Sale, Charcoal Powder,Firewood Columbus, waste-wood-pallet, Buy Charcoal the well price and our services are very fast.
Click here for
Contact +420 773 635 213 , Email-Id :info@bestpalletsonline.com
I was diagnosed as HEPATITIS B carrier in 2013 with fibrosis of the
ReplyDeleteliver already present. I started on antiviral medications which
reduced the viral load initially. After a couple of years the virus
became resistant. I started on HEPATITIS B Herbal treatment from
ULTIMATE LIFE CLINIC (www.ultimatelifeclinic.com) in March, 2020. Their
treatment totally reversed the virus. I did another blood test after
the 6 months long treatment and tested negative to the virus. Amazing
treatment! This treatment is a breakthrough for all HBV carriers.
ankara
ReplyDeletesakarya
tekirdağ
kastamonu
amasya
Q3FF
van evden eve nakliyat
ReplyDeletesivas evden eve nakliyat
çankırı evden eve nakliyat
bartın evden eve nakliyat
erzincan evden eve nakliyat
JXKSM5
kırklareli evden eve nakliyat
ReplyDeleteısparta evden eve nakliyat
istanbul evden eve nakliyat
ankara evden eve nakliyat
kırıkkale evden eve nakliyat
EMHAG
Is this table for sale?
ReplyDeletefarmhouse style wood console - where to buy one??
ReplyDeleteFCD96
ReplyDeleteBursa Parça Eşya Taşıma
Van Lojistik
Ordu Evden Eve Nakliyat
Çorum Evden Eve Nakliyat
Manisa Parça Eşya Taşıma
A2821
ReplyDeleteÇerkezköy Halı Yıkama
Ünye Koltuk Kaplama
İzmir Şehir İçi Nakliyat
Tunceli Şehir İçi Nakliyat
Kocaeli Parça Eşya Taşıma
Yalova Parça Eşya Taşıma
Bursa Parça Eşya Taşıma
Niğde Parça Eşya Taşıma
Iğdır Lojistik
C87C0
ReplyDeleteGümüşhane Şehir İçi Nakliyat
Manisa Parça Eşya Taşıma
Ardahan Lojistik
Urfa Parça Eşya Taşıma
İzmir Parça Eşya Taşıma
Ünye Asma Tavan
Kilis Evden Eve Nakliyat
Ankara Parça Eşya Taşıma
Çorum Şehirler Arası Nakliyat
783B0
ReplyDelete%20 referans kodu
6F79D
ReplyDeletebinance %20 komisyon indirimi
Respect and I have a swell give: When To Renovate House simple home renovations
ReplyDeleteThank You and I have a neat proposal: How To Design House Renovation house renovation calculator
ReplyDeleteشركة تنظيف مجالس بالدمام UIZBt7dX1l
ReplyDeleteشركة عزل خزانات بابها GT1kQ7oTUo
ReplyDeleteDiscover Vibecrafts' exquisite Console Table, designed to elevate any room with a blend of style and functionality. Perfect for entryways or living spaces, our collection offers unique designs that add elegance and charm to your home decor. Shop now for premium Console Tables that inspire sophistication.
ReplyDeleteشركة تسليك مجاري J7FKDXuGAV
ReplyDeleteشركة شفط بيارات maJWXSvSjt
ReplyDeleteشركة عزل اسطح براس تنورة APzcWDr8qj
ReplyDelete8352C82C90
ReplyDeletedüşmeyen takipçi
5F32FBDBF7
ReplyDeleteorganik kadın takipçi
AC879A8263
ReplyDeletegerçek türk instagram takipçi
D329CB4FF0
ReplyDeletetik tok takipci kasma
97479DA655
ReplyDeletetiktok organik takipçi
07A82C4CBD
ReplyDeletetürk takipçi satın al
Razer Gold Promosyon Kodu
Sıra Bulucu
Sıra Bulucu
MMORPG Oyunlar
Online Oyunlar
Dragon City Elmas Kodu
Sıra Bulucu
Google Yorum Satın Al
شركة مكافحة النمل الابيض بالنعيرية VQhKSrYrIh
ReplyDeleteشركة تنظيف بالقطيف nbqLZWeLkT
ReplyDeleteThat PB-inspired console table project is fantastic! The way you captured that rustic wood console table look is spot-on, and it's so inspiring to see how you made it your own.
ReplyDeleteConsole tables are a perfect blend of style and function. At Vibecrafts, you can explore beautifully designed console tables that add elegance to any space while keeping it organized.
ReplyDeleteThat console table turned out beautifully, I love how you brought the inspiration to life in your own way. It reminded me of working on a Paint by Numbers Fish kit, which also transforms simple details into something striking and unique.
ReplyDeleteGreat article! A console table really does add both beauty and function to any home. I’ve been exploring different styles recently and came across Vibecrafts. Their collection of console tables has stylish wooden designs and modern options with storage that perfectly fit today’s interiors.
ReplyDeleteReally enjoyed reading this post! A well-designed console table adds instant elegance and structure to a space without feeling bulky. I love how it works perfectly in entryways and living rooms while also serving as a stylish display surface. I recently explored Vibecrafts’ collection, and their console tables are beautifully crafted - ideal for giving modern interiors a refined and functional touch.
ReplyDeleteReally enjoyed reading this post! A stylish console table adds instant elegance and structure to a space without taking up much room. I love how it works perfectly in entryways and living areas while also serving as a great display surface. I recently explored Vibecrafts’ collection, and their console tables are beautifully crafted - perfect for adding a modern and refined touch to home interiors.
ReplyDeleteThis console table from Vibecrafts adds charm and functionality together. Modern look, sturdy build, and perfect for organizing essentials. It blends style with practicality, making every corner feel warm, classy, and thoughtfully designed for today’s homes.
ReplyDeleteGreat post on console table décor! It’s amazing how such a simple piece can add both style and functionality to a space. I recently explored Vibecrafts, and their collection offers elegant designs with great quality. Perfect for anyone looking to enhance their entryway or living area with a modern and practical touch.
ReplyDeleteconsole table from Vibecrafts is a smart choice for entryways, living rooms, or hallways. Designed for daily use, it offers space for décor and essentials while fitting easily into different interiors, helping you keep your home organized and well-arranged with Vibecrafts’ furniture collection.
ReplyDeleteconsole table from Vibecrafts. Perfect for entryways, living rooms, and hallways, these wooden console tables offer useful storage and decorative appeal while helping keep your space organized, practical, and visually attractive.
ReplyDelete
ReplyDeleteconsole table collections from Vibecrafts. Perfect for hallways, living rooms, bedrooms, and entryways, these modern table designs add decorative charm and practical surface space while helping create organized and visually attractive home interiors with modern furniture styling.
console table from Vibecrafts. Our collection offers practical furniture for displaying lamps, photo frames, plants, and decorative accessories while helping create an organized and welcoming space that suits both modern and traditional home interiors.
ReplyDeleteconsole table collection at Vibecrafts for entryways, hallways, living rooms, and bedrooms. Our designs provide the perfect space for decorative accessories, lamps, and photo frames while adding functionality and visual appeal to modern and traditional home interiors.
ReplyDeleteconsole table at Vibecrafts for your entryway, living room, or hallway. Explore wooden and modern designs crafted for everyday use, offering both style and functionality. Shop online to find quality furniture at affordable prices for every home.
ReplyDelete