
Damask Upholstered Bench Tutorial

Now for my latest project- the Damask Upholstered Bench. Another "check" on the list of furniture I am building in my Jewel Box Guest Room. I wanted an upholstered bench for the end of the bed. You know for putting on shoes?.....(though we all know it's really just to look pretty). No joke, this bench took me two days to make....not full days either, most of the time was spent waiting for glue and paint to dry. I have made a few ottomans and benches in my day so I have some experience, I guess with experience comes ease of project.
Plus, when I first made these I spent too much money on the "cushioning" inside. I have learned my lesson and now know how to get all the materials for MUCH cheaper. This project is strictly my own plan and design, if you use it and build one and post it.... please credit me and link back to Lipstick and Sawdust.
Dimensions:
51 inches long x 11 inches wide x 19 1/2 inches tall
Material list:
For the upholstered part you need:
2 boards - mine were 2x6's at 50 7/8"
2 scrap wood blocks appx 2 inches x 6 inches
2 feet of 54" wide decor fabric (22 to 24 inches long)
2 feet of batting or fleece fabric
High density foam 2 inch thick -11 inches wide by 50 7/8 inches long
(you can piece two pieces together here)
hot glue
staple gun
screws
optional: upholstery tacks
For the frame you need:
2 1x3's at 50 7/8
2 1x3's at 9 1/2
4 legs at 16 5/8
pocket hole jig
countersink bit
screws 1 1/2 inch long #12's
pocket hole screws kreg jig 1 1/4 inch screws
wood glue
wood glue
spray paint
spray poly-acrylic
Here is how to upholster the top:
Start with your boards. These were just two junk 2x6's I got for free. I used my newest tool. A hand me down planer from my grandfather (!!!). I am soooo excited. I planed each board to cut the junk off of the top and bottom. I planed both sides about 1/16 th of an inch each. It made the boards look smoother and cut off all of the old glue and wood filler.
 |
| Stack the 2x6's next to each other. |
Next I took my two scrap 2 inch by 6 inch blocks and screwed them to either side of the boards to connect them. Like this:
 |
| This is the underside of the bench. |
Next, time for the high density foam. Now the secret to this stuff is to get it cheap - well as cheap as possible. This stuff is expensive - don't believe me??? Sometimes they can be 70 dollars per yard! Yep!
So here is what I did to get it cheaper. I went to IKEA on a Tuesday....(free kids meals). I stopped by the As-Is area and found a EKTORP cushion in red. All I wanted was the inside- the high density foam at 2 inches thick. I got it for $14.50 ! (whoop whoop!)
 |
| I only want the inside foam. |
See! 50% off!

I cut the foam to size. Tip: use a serrated knife to cut the foam easier.
 |
| Two pieces butted up next to each other. |
 |
| Hot glue it to the wood. |
Next, I used a muslin type fabric (I think it was curtain liner) to wrap the foam. I skipped my normal step of wrapping the foam with batting. Mistake! That's why I did not add this to the material list.
 |
| I wrapped the foam in muslin and pulled taught and stapled it on the back, but I would not do this again. |

 |
| Next, I decided it needed a softer shape, so I decided to add fleece. |
Instead after the foam goes on , you should be wrapping with batting. I did not want to spend any money on batting so I used some scrap fleece my mother-in-law gave me years ago. The print did not matter because my final fabric is pretty thick and well printed.
 |
| The fleece layer, stapled. |
 |
| Fold edges over tightly to "round out" the corners. |
Next time for the good final layer. I wrapped the damask fabric onto of the fleece.

 |
| Cut off the excess fabric. |
Here is what it looks like at this point.

The next thing I did to the ends was to add some upholstery tacks. This is mostly because when attaching the fabric to the wood I had a little of selvage showing (you know the print on the edges of the fabric). I needed to cover this up. I had these tacks from an old project. I had them laying around the house - literally in my recipe book cabinet in a bowl. Don't ask. This is very typical for me, random building supplies all over the house. I tacked them through the fabric onto the wood with a rubber hammer.
 |
| Number one tack. I then spaced them about 1/4 inch apart. |
 |
| Finished edge. |
Now for the frame.
The frame consists of the "frame" and the legs"-- thats it!
I filled in the holes in with wood filler and let glue dry. The next day, I sanded the wood down with 120 grit sandpaper then 220 grit sandpaper. Then I used my kreg jig to drill pocket holes on the sides of the 1x3's so I could attach the frame to the top.


I spray painted with Rustoleum 2 x cover black semi-gloss. Two coats - let them dry about 30 minutes in-between. I flipped it over and made sure to spray the legs inside the creases.
After about 30 more minutes of allowing to dry, I sprayed a coat of Poly-acrylic spray in clear satin. Then allowed to dry about 3 hours.
Next, time to attach the upholstered piece to the frame using the pre-drilled pocket holes.


Hope you enjoyed this project. Drop me a line!
Happy Building!
Kristen
The frame consists of the "frame" and the legs"-- thats it!
 |
| I cut all legs to 16 5/8". |
I found the legs at the Habitat for Humanity Restore. I bought 8 of them. They used to be ballusters from someones old staircase. They were 50 cents each I think, not sure...I bought them over a year ago.
I cut my 1x3 boards to the sizes listed above. I got out my wood glue and clamps and my countersink drill bit and got to work.
I decided since the wood legs were square to just glue and attach the 1x3's to the legs. I started in the corners like this.
I first coated two sides of the legs with wood glue- then clamped them together then countersunk each screw from the outside, two on each leg.
Thermal note!
**It was so cold and windy outside I brought this project inside and built it on my kitchen counter.
Now legs 3 and 4.
I cut my 1x3 boards to the sizes listed above. I got out my wood glue and clamps and my countersink drill bit and got to work.
I decided since the wood legs were square to just glue and attach the 1x3's to the legs. I started in the corners like this.
 |
| Leg #2 |
Thermal note!
**It was so cold and windy outside I brought this project inside and built it on my kitchen counter.
Now legs 3 and 4.
 |
| Lookin good. |
The top "resting" on the frame:
 |
| Guess I could'a painted it white as well. |
I filled in the holes in with wood filler and let glue dry. The next day, I sanded the wood down with 120 grit sandpaper then 220 grit sandpaper. Then I used my kreg jig to drill pocket holes on the sides of the 1x3's so I could attach the frame to the top.
 |
| Adding pocket holes for later. |
I drilled three on each long side and one per short side. I used 1 1/4 inch kreg jig screws.
Next, I wiped the entire frame down with a wet cloth and spray painted the frame.


I spray painted with Rustoleum 2 x cover black semi-gloss. Two coats - let them dry about 30 minutes in-between. I flipped it over and made sure to spray the legs inside the creases.
After about 30 more minutes of allowing to dry, I sprayed a coat of Poly-acrylic spray in clear satin. Then allowed to dry about 3 hours.
Next, time to attach the upholstered piece to the frame using the pre-drilled pocket holes.
 |
| Attaching the top to the frame via pocket holes. |
I used the kreg jig screwdriver attachment to screw in the self- tapping screws. This worked perfectly!
 |
| Working just as planned. |
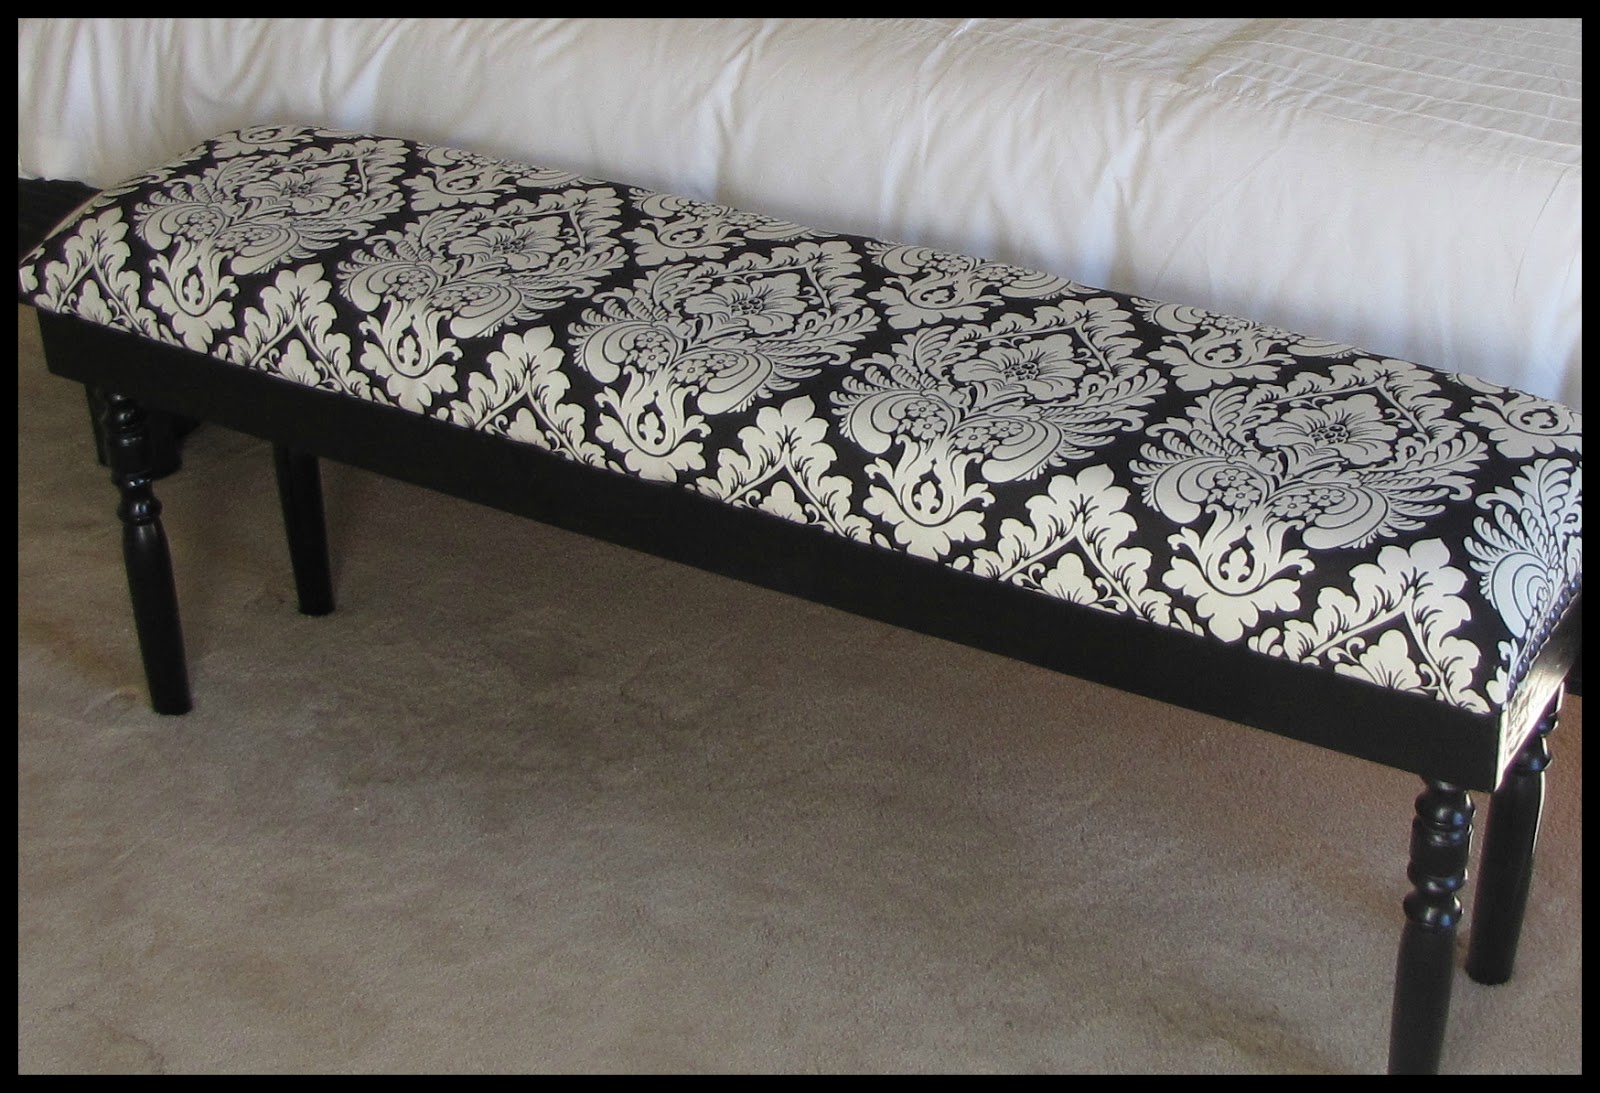
Ta-da! So excited when a project comes together just like I dreamed it would. This project was instantly gratifying for me.
Here are a few beauty shots.

Hope you enjoyed this project. Drop me a line!
Happy Building!
Kristen
Beautiful. Love it.
ReplyDeleteglad to see a simple project that looks great. thanks for posting. i have been looking for a bench and i could do that!
ReplyDeleteFirst of all....I LOVE the name of your blog!
ReplyDeleteThanks for sharing your talent. I'll give it a try.
I love this look! Thanks for the great detail. Bookmarked it and about to go hunting at Ikea for similar cushions. Your damask fabric is perfect. Thanks
ReplyDeleteYea! Great! Can't wait to hear how it turns out. Our Ikea marks down the As- is department even further on Thursdays. The free kids meals are Tuesdays. I love IKEA!
DeleteI LOVE your blog! Made two upholstered dining benches this weekend and used your tutorial as a guide. Had some designs drawn up already, but your tutorial was an excellent source to help with execution! Thank you for sharing all of your great ideas!
ReplyDeleteWonderful! I am so happy for you! You can email me a pic if you'd like.
Deletelipstickandsawdust@gmail.com
Kristen
This is beautiful, awesome job! I'm thinking of attempting a first wood project and maybe this is a good. I don't have a kreg jig though.
ReplyDeleteHere is my new master bedroom bench! THanks for the tutorial
ReplyDeletehttp://krafty-k.blogspot.com/2013/02/upholstered-bench.html
Impressive, i am totally doing this. I have my room in this print with Maroon/Red accents for my Pop. Wal-Mart has a Damask Bed spread that will match perfectly with this! I cannot thank you enough! I will definitely post and give you props once i do this. I am a procrastinator so it may be a while, but it's on my list lol.
ReplyDeleteIs there a way to do this without the Kreg drill? Thanks!
ReplyDeleteI just answered my own question! I can use little L brackets to connect the top to the frame :)
Delete