
Shabby Chic Herb Garden Tutorial

~Reverse building project~
~Even if you don't have a pallet, make it look like a pallet~
Please enjoy my newest tutorial for this super cute herb garden. I used mostly one scrap piece of 3/4 inch plywood to build this entire project. It's funny that I kind of call this project my "reverse build", and here is why: everyone these days are making furniture out of pallets... pallet beds, pallet tables, pallet shelving, pallet rolling carts, pallet chairs, pallet couches, pallet outdoor furniture, pallet gardens...you name it- someone has made it out of a pallet. A pallet is a wooden structure used for shipping items constructed for a forklift to easily pick it up and move goods around. There are 6 standard pallet sizes, and many people can get their hands on one and spiff it up and build furniture out of it. Mostly made of pine, and not the greatest quality wood it is made to withstand 1,000 pounds of goods. Us "furniture builders" usually cringe when seeing these types of projects, because making something out of a pallet is not really "building", but the truth is you can still make some pretty cool looking stuff from a pallet. Since I don't make it a habit of collecting pallet's. I made my own pallet from the plywood and a few 1x pieces.
This project is for my son's class project for the school's annual Gala auction, since I am usually the project doer for my kids' classes- I took on this project no problem. The picture I was sent to recreate was this one- made from surprise! A pallet.

I had to recreate it so - up next find scraps and a buy few new pieces and make a pallet herb garden.
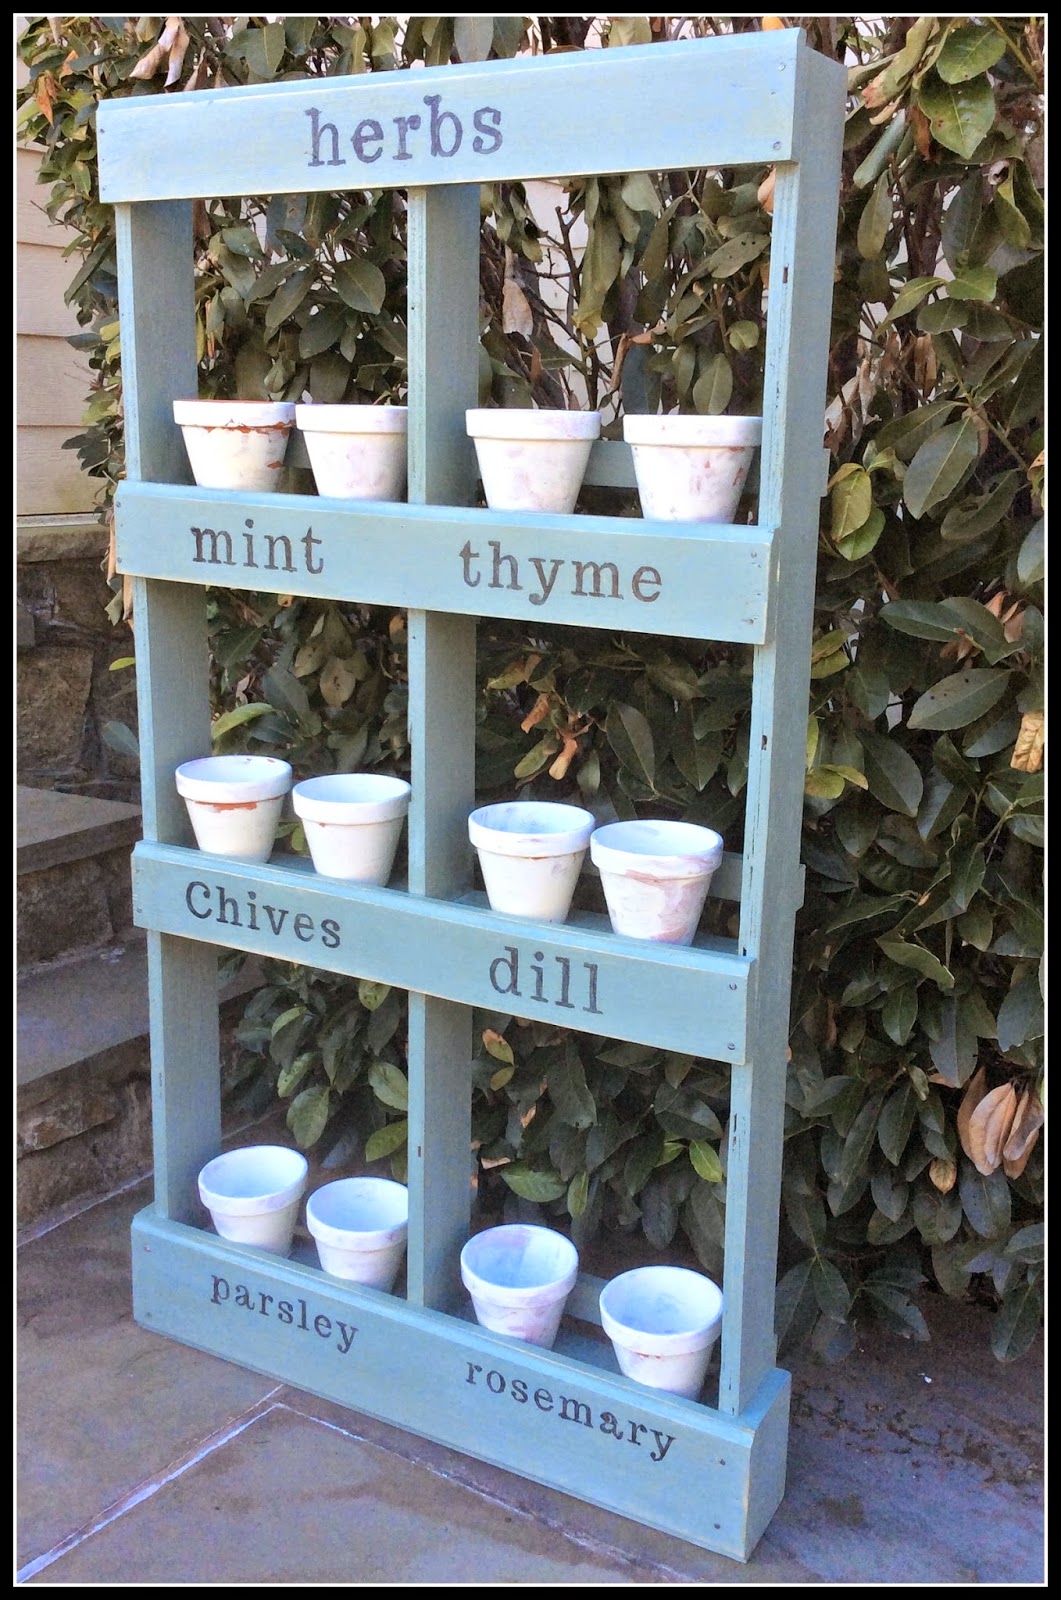
Here is my version:
Final dimensions, 49 inches tall x 26 1/4 inches wide x 4 1/4 inches deep
Here's what you need-
1 piece of plywood 3/4 inches thick about 4 feet wide and 5 feet long
3 pieces of 1x2's one at 6 foot and one at 4 foot
1 1x6 at 27 3/4 inches long
nail gun w/nails
old nails with pretty wide tops (to give the piece character)
gorilla/ wood glue
kreg jig and 1 1/4 inch coarse screws
clamps, paint
sander
pots for herbs
varnish or sealant if being used outdoors
varnish or sealant if being used outdoors
router (if desired for adding detail)
Cut list-
3 pieces of cut plywood @ 3.5 inches wide x 49 inches tall x 3/4 inches thick (same size as a 1x4) for side legs and middle
3 pieces of cut plywood @ 3.5 inches wide x 26 1/4 inches wide x 3/4 inches thick (again, same size as a 1x4 ) for front rails
6 pieces of cut plywood @ 3.5 inches wide x 12 1/8 inches for shelves
1 piece of 1x6 cut @ 27 3/4 inches wide for front footer
1 piece of plywood cut at 3.5 inches wide x 25 7/8 inches long (same as a 1x4) for back of footer
2 pieces of 1x6 cut at 3.5 inches wide for footer sides
3 1x2's cut @ 26 1/4 inch long
Starting off- I cut my lumber
 |
| Original plywood scrap |
 |
| Used circular saw to cut down. |
 |
| Set my fence at proper width and ripped with my table saw. |
 |
| Ripping and more ripping |
Then use your keg jig to drill holes in the sides of the shelves only, these will be installed holes down.
 |
| Shelf piece with two sets of keg jig holes drilled. |
 |
| You will need 6 shelves. |


Use wood glue and screw in the shelves to the side and middle rails. Use a clamp to help strengthen the glue and tighten the integrity of the piece.
 |
| Kreg screws you will need |
 |
| Wood gluing all joinery with an old little paint brush. |
 |
| Underside shot of joining the shelves to the side legs. |
Next, lets give the front rails some character. I used my router to route the wood and give it some coved detailing. I started with the footer and routed each long end of the 1x6 footer to add detail.
A cove router bit looks like this and makes this shape in the wood.

A cove router bit looks like this and makes this shape in the wood.
 |
| A dangerous picture - holding router while trying to take a pic = prob not the safest. |
 |
| Can you see the detailing? |
Then, I attached the footer of the front of the frame. Please note this footer must leave 3/4 of an inch on each end in order for the footer sides to be attached.

 |
| See overhang for side footer?? |
And now the side footers.
 |
| Nail and glue them on. |
Stand her up.
 |
| Very solid- but needs a back to the footer to counterweight. |
For the back of the footer. I have no real specific pic of this. But I realized when standing - there needed to be more weight on the back of the piece to steady it. This is when I glued and nailed in the back footer piece. This piece is 25 7/8 inches long and only reaches the top of the bottom shelf. No back overhang. This is mostly for weight and structure. I did not do any fancy routing for this piece.
Next the front rails. I routed the same cove pattern to the top of each rail and glued and nailed on each rail. Please note there is about 1/4 of an inch hanging over to cover the bottom of each shelf, and about 2 inch lip over the shelf to hold the pots.
Next the front rails. I routed the same cove pattern to the top of each rail and glued and nailed on each rail. Please note there is about 1/4 of an inch hanging over to cover the bottom of each shelf, and about 2 inch lip over the shelf to hold the pots.

 |
| Looks great! |
Next for the "let's make it look like an old pallet". I found some old nails that I had pulled out of an old wardrobe and used 2 on each side of the rails to make it look old and like a pallet for real. See?
 |
| Old rusty nail to add character ** |
**Note I predrilled the holes for these and tapped them into the wood with a rubber hammer. Hammering them in would have bent them or split the wood, they were pretty thick.
 |
| Predrilled and tapped in. |
Then I sanded the entire piece down, just with 120 all over and with 120 and 220 on the front rails. I wanted this to look like a pallet so not a ton of sanding was needed.
Now to paint. I used a mix of 5 parts Provence and 2 parts French linen Annie Sloan chalk paint that I had on hand. I mixed it in my kitchen with a spoon - it was the perfect amount!


Start painting-
 |
| Nice. This thing only needs about one coat. |

And painting finished!

And a little light sanding on the corners for distressing. I used a 220 sanding block to sand the edges and some corners, also I sanded over the painted nails so that they would show through- again - trying to make the piece look more shabby.

I bet you are wondering about the back rails the 1x2's huh? Well, I could not add those yet until I purchased the pots, so I just painted them ahead of time while the paint was still mixed and went out to purchase the pots.

Next for those purdy names of herbs I added to the garden frame. I wanted to have accurate information on the herbs one could plant in the garden in our area of the country so, I googled "best herbs to grow in _______ (state). Found the top 6 easiest and best to grow together and came up with the following: Chives, Mint, Dill, Rosemary, Parsley, Basil.
I went to a stencil maker program online and printed out these words, then took hours and cut them out with a pair of eyebrow scissors that my German cousin gave me. Turns out Germans make some awesomely sharp little tiny scissors.
I bet you are wondering about the back rails the 1x2's huh? Well, I could not add those yet until I purchased the pots, so I just painted them ahead of time while the paint was still mixed and went out to purchase the pots.
I got them at BIG LOTS for 6 dollars for 2. The size are 4.5 inches wide on top to 2 3/4 inches wide on bottom. They are 4 inches tall. Once I brought those home I set them on the shelves and nailed the 1x2's under the rim of the pot snugly so that they would not fall back.
Next for those purdy names of herbs I added to the garden frame. I wanted to have accurate information on the herbs one could plant in the garden in our area of the country so, I googled "best herbs to grow in _______ (state). Found the top 6 easiest and best to grow together and came up with the following: Chives, Mint, Dill, Rosemary, Parsley, Basil.
I went to a stencil maker program online and printed out these words, then took hours and cut them out with a pair of eyebrow scissors that my German cousin gave me. Turns out Germans make some awesomely sharp little tiny scissors.
 |
| Scissors best used for eyebrows, thread, and paper stencils. |
Next I taped the stencil to the dried herb garden frame and stenciled the words carefully using old black spray paint that I dabbed with a q-tip.


 |
| That took forever and it was a short word! |
 |
| All the words done! Praise God! |
And for the last two parts, I got the terra cotta colored pots in to school for the Pre-K class to paint and then it was time to seal the frame somehow.
At school: We used some extra cream paint I had sitting around for the pots and the Pre-K kids loved painting them with sponge brushes. We let them dry then sprayed with a poly coating for outdoors.
At home in the shop: Now for the sealant. I decided - because I did not want to go spend more money on the project on a varnish I had left in the garage that is made for outdoor projects like my picnic tables I built and for boats etc. It's some pretty tough stuff for the elements, and it's smells very potent. My daughter thought she would die when she caught a whiff of it in the garage. I dipped a rag in the varnish and covered it thinly and quickly to coat and allowed to dry for 2 days.
And a glam shot!
~~~Kristen
At school: We used some extra cream paint I had sitting around for the pots and the Pre-K kids loved painting them with sponge brushes. We let them dry then sprayed with a poly coating for outdoors.
At home in the shop: Now for the sealant. I decided - because I did not want to go spend more money on the project on a varnish I had left in the garage that is made for outdoor projects like my picnic tables I built and for boats etc. It's some pretty tough stuff for the elements, and it's smells very potent. My daughter thought she would die when she caught a whiff of it in the garage. I dipped a rag in the varnish and covered it thinly and quickly to coat and allowed to dry for 2 days.
 |
| Wearing my OJ Simpson gloves. Sorry not a clear pic but hard to do using varnish this strong. |
 |
| Cabot varnish I used actually it did not yellow the paint as I was afraid it would it was just light enough to coat the frame but not so caked on to discolor the paint. |
And a glam shot!
LOVE THIS PROJECT. It will be auctioned off at the end of April with the seed
packets for each herb.
Thanks for checking out my tutorial!
Drop me a line and like me on Facebook!
~~~Kristen
ReplyDeleteYour “Shabby Chic Herb Garden Tutorial” is such a charming and refreshing DIY idea! I love how you combined rustic materials with a soft, vintage aesthetic to create something both beautiful and functional. It’s inspiring to see how everyday items can be transformed into a decorative garden piece with just a bit of creativity and care. Your step-by-step instructions make the project feel totally approachable, even for those who are new to gardening or DIY. Projects like this really show how personal touches can enhance any space, indoors or out. For readers looking to take their home transformation a step further, R for Remodelers offers expert remodeling services to help bring style and function into every corner of the home.
महाकालसंहिता कामकलाकाली खण्ड पटल १५ - ameya jaywant narvekar कामकलाकाल्याः प्राणायुताक्षरी मन्त्रः
ReplyDeleteओं ऐं ह्रीं श्रीं ह्रीं क्लीं हूं छूीं स्त्रीं फ्रें क्रों क्षौं आं स्फों स्वाहा कामकलाकालि, ह्रीं क्रीं ह्रीं ह्रीं ह्रीं हूं हूं ह्रीं ह्रीं ह्रीं क्रीं क्रीं क्रीं ठः ठः दक्षिणकालिके, ऐं क्रीं ह्रीं हूं स्त्री फ्रे स्त्रीं ख भद्रकालि हूं हूं फट् फट् नमः स्वाहा भद्रकालि ओं ह्रीं ह्रीं हूं हूं भगवति श्मशानकालि नरकङ्कालमालाधारिणि ह्रीं क्रीं कुणपभोजिनि फ्रें फ्रें स्वाहा श्मशानकालि क्रीं हूं ह्रीं स्त्रीं श्रीं क्लीं फट् स्वाहा कालकालि, ओं फ्रें सिद्धिकरालि ह्रीं ह्रीं हूं स्त्रीं फ्रें नमः स्वाहा गुह्यकालि, ओं ओं हूं ह्रीं फ्रें छ्रीं स्त्रीं श्रीं क्रों नमो धनकाल्यै विकरालरूपिणि धनं देहि देहि दापय दापय क्षं क्षां क्षिं क्षीं क्षं क्षं क्षं क्षं क्ष्लं क्ष क्ष क्ष क्ष क्षः क्रों क्रोः आं ह्रीं ह्रीं हूं हूं नमो नमः फट् स्वाहा धनकालिके, ओं ऐं क्लीं ह्रीं हूं सिद्धिकाल्यै नमः सिद्धिकालि, ह्रीं चण्डाट्टहासनि जगद्ग्रसनकारिणि नरमुण्डमालिनि चण्डकालिके क्लीं श्रीं हूं फ्रें स्त्रीं छ्रीं फट् फट् स्वाहा चण्डकालिके नमः कमलवासिन्यै स्वाहालक्ष्मि ओं श्रीं ह्रीं श्रीं कमले कमलालये प्रसीद प्रसीद श्रीं ह्रीं श्री महालक्ष्म्यै नमः महालक्ष्मि, ह्रीं नमो भगवति माहेश्वरि अन्नपूर्णे स्वाहा अन्नपूर्णे, ओं ह्रीं हूं उत्तिष्ठपुरुषि किं स्वपिषि भयं मे समुपस्थितं यदि शक्यमशक्यं वा क्रोधदुर्गे भगवति शमय स्वाहा हूं ह्रीं ओं, वनदुर्गे ह्रीं स्फुर स्फुर प्रस्फुर प्रस्फुर घोरघोरतरतनुरूपे चट चट प्रचट प्रचट कह कह रम रम बन्ध बन्ध घातय घातय हूं फट् विजयाघोरे, ह्रीं पद्मावति स्वाहा पद्मावति, महिषमर्दिनि स्वाहा महिषमर्दिनि, ओं दुर्गे दुर्गे रक्षिणि स्वाहा जयदुर्गे, ओं ह्रीं दुं दुर्गायै स्वाहा, ऐं ह्रीं श्रीं ओं नमो भगवत मातङ्गेश्वरि सर्वस्त्रीपुरुषवशङ्करि सर्वदुष्टमृगवशङ्करि सर्वग्रहवशङ्करि सर्वसत्त्ववशङ्कर सर्वजनमनोहरि सर्वमुखरञ्जिनि सर्वराजवशङ्करि ameya jaywant narvekar सर्वलोकममुं मे वशमानय स्वाहा, राजमातङ्ग उच्छिष्टमातङ्गिनि हूं ह्रीं ओं क्लीं स्वाहा उच्छिष्टमातङ्गि, उच्छिष्टचाण्डालिनि सुमुखि देवि महापिशाचिनि ह्रीं ठः ठः ठः उच्छिष्टचाण्डालिनि, ओं ह्रीं बगलामुखि सर्वदुष्टानां मुखं वाचं स्त म्भय जिह्वां कीलय कीलय बुद्धिं नाशय ह्रीं ओं स्वाहा बगले, ऐं श्रीं ह्रीं क्लीं धनलक्ष्मि ओं ह्रीं ऐं ह्रीं ओं सरस्वत्यै नमः सरस्वति, आ ह्रीं हूं भुवनेश्वरि, ओं ह्रीं श्रीं हूं क्लीं आं अश्वारूढायै फट् फट् स्वाहा अश्वारूढे, ओं ऐं ह्रीं नित्यक्लिन्ने मदद्रवे ऐं ह्रीं स्वाहा नित्यक्लिन्ने । स्त्रीं क्षमकलह्रहसयूं.... (बालाकूट)... (बगलाकूट )... ( त्वरिताकूट) जय भैरवि श्रीं ह्रीं ऐं ब्लूं ग्लौः अं आं इं राजदेवि राजलक्ष्मि ग्लं ग्लां ग्लिं ग्लीं ग्लुं ग्लूं ग्लं ग्लं ग्लू ग्लें ग्लैं ग्लों ग्लौं ग्ल: क्लीं श्रीं श्रीं ऐं ह्रीं क्लीं पौं राजराजेश्वरि ज्वल ज्वल शूलिनि दुष्टग्रहं ग्रस स्वाहा शूलिनि, ह्रीं महाचण्डयोगेश्वरि श्रीं श्रीं श्रीं फट् फट् फट् फट् फट् जय महाचण्ड- योगेश्वरि, श्रीं ह्रीं क्लीं प्लूं ऐं ह्रीं क्लीं पौं क्षीं क्लीं सिद्धिलक्ष्म्यै नमः क्लीं पौं ह्रीं ऐं राज्यसिद्धिलक्ष्मि ओं क्रः हूं आं क्रों स्त्रीं हूं क्षौं ह्रां फट्... ( त्वरिताकूट )... (नक्षत्र- कूट )... सकहलमक्षखवूं ... ( ग्रहकूट )... म्लकहक्षरस्त्री... (काम्यकूट)... यम्लवी... (पार्श्वकूट)... (कामकूट)... ग्लक्षकमहव्यऊं हहव्यकऊं मफ़लहलहखफूं म्लव्य्रवऊं.... (शङ्खकूट )... म्लक्षकसहहूं क्षम्लब्रसहस्हक्षक्लस्त्रीं रक्षलहमसहकब्रूं... (मत्स्यकूट ).... (त्रिशूलकूट)... झसखग्रमऊ हृक्ष्मली ह्रीं ह्रीं हूं क्लीं स्त्रीं ऐं क्रौं छ्री फ्रें क्रीं ग्लक्षक- महव्यऊ हूं अघोरे सिद्धिं मे देहि दापय स्वाहा अघोरे, ओं नमश्चा ameya jaywant narvekar